Disassemble A Smith & Wesson Revolver
Disassemble A Smith & Wesson Revolver
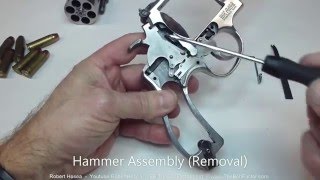 A S&W 629-4, N-Frame, .44 Mag being completely disassembled and then reassembled.
(Important: Please read the two follow up notes below.)
NOTE #1: I forgot to show the re installation of the main spring. Say what? Ya, I know. Weird. How did I forget that? It should have been reinstalled at time-stamp 19:23. Just take a look at it during the disassembly, and you can easily see how it needs to go back in.
NOTE #2: The last two screws that I show removing from the side plate during the disassembly, were in the incorrect holes. The screws are slightly different, and one of the screws has a tapered head on it, which lets it sit flush with the plate when screwed all the way in. That screw should have been put in the other hole, which is eventually covered by the grip when the grip is re-installed. That’s why it needs to be flush with the plate. I also put the screws back in the wrong holes when reassembling it. I guess I’m pretty consistent when I mess up.
NOTE #3: I would normally wipe the parts down with Hoppe’s No. 9 during the reassembly, but I didn’t while making this video because I didn’t want to get any oil on the camera. I should have still talked about wiping the parts down in the video though.
-Bob
Thanks for the informative video. I have a quick question – is there a hole in the frame that the cylinder bolt plunger fits into?
Well done Bob, will there is a lot difference with a Ruger revolver and if there is, can you do the same with it? Please!
I gut some nuts you can grip
Fantastic how to for the S&W revolver!!! I’ve never seen one so comprehensive!!!
While I already know how you went into perfect detail about every step needed to disassemble and reassemble.
Great job!!!
Every new S&W owner needs to watch this video!
Great instructions, I was just wondering why you don’t use any oil or lube ?
i got a model 25-5 with rust build up.this video helped me out a lot both guns are identical. what did you use to get the rust off
Awesome! Thank you
Very good presentation clearly understandable, thank you.
It’s good to have a magnetic tray to hold the screws and other small parts…
Its like the mysteries of the universe are revealed right before our eyes. Now how do we find the lost spring? 👍👍
Doesn’t look like there’s any metal injection molded parts. What is your opinion about molded injection metal? Great video thank you
Are these the same steps with an L frame model?
This video is fantastic. Make more!!!
thank you for the details.
Triple A plus. It gets no better.
Will these exact directions work on a 500 smith and wesson. My son wants to send his away to get it polished but they want it disassembled when it arrives. Very nice job teaching this. Very easy to follow.
The best tutorial on a Smith & Wesson until today.
Step one on any firearm, remove any and all ammunition from the table lol.
Sir thank u 4 clear tutorial and verrry informative video,
Great video, anyone else watch videos like this of guns I don’t own just so i know about the gun.
Thank you
My model 66-4 has a half cock safety that stopped working after i cleaned it. I double checked but don’t see the problem. If you did a video on that area i would watch it. I don’t worry about the safety but do think about it not firing. Thanks.
Why would anybody give this video a thumbs down…wait let me guess some shady gunsmiths! Great video Sir!
This video is very well done. I needed it. I just bought a Model 64 that is in need of some love. I want to polish it up and this will be the first step. Thanks.
I watched this video just to figure out how to reinstall the hammer block properly so I could close the plate. Outstanding video content. A+ production.
S&w revolver…..hammer assembly.👍👍👍Like…..
I just purchased the revolver a week ago brand new. The cylinder lock was sticking in the down position due to a bur on the frame. A little file tool care of it. Really didn’t want to ship it back to the factory. Kinda of disappointed with this. $1000 pistol shouldn’t have something like this overlooked in the assembly dept.
One of the best revolver disassembly and assembly video. It helped me give my revolver a complete cleaning. Thank you.
Awesome job,thank you
*mrmasterglock on wickr* got Pistol: Custom Glock 17L (with stainless slide), Rifle: 9mm Ruger PC9 Carbine or Custom 9mm AR-9 Carbine or Custom 9mm KPOS Scout pin on pubg,2mm kolibri,beretta,bul,colt,grand power,mac-11,)?Glock19Carbine,Shotgun:Custom Saiga 12 or Custom Vepr 12..
Wow just wow… best explanation video I’ve ever seen .. Great Awesome video.. BEST
Thank you
I’d like to say thank you for such a calm, clear informative and informal presentation. No drama, no raised tones, no slang or swearing. You demonstrated the procedure really clearly, making no assumptions of the viewer’s prior knowledge of S&W internals. I’m in Glasgow, Scotland and I own a deactivated S&W 10-8. Handgun ownership is quite rare, but not completely prohibited in the UK. I like tinkering with mechanical things, and your presentation was the first I viewed. Thank you for sharing .
Great video
Le Smith sono incasinate tutte.Le Ruger Gp 100 in 3 minuti si smontano sono il topppp
gracias perri sos un crack
That pin inside the rebound slide spring is actually a trigger stop pin and is normally found on models 25 and 29 (629). This pin is factory cut to length (fit) to stop trigger over travel.
Great video, very informative, and I really liked the content. The simplicity, and elegance of design that S&W as compared to Colt is just astounding.
A couple of things:
1. I have seen other videos where the yoke is removed while the cylinder is held in place, and is considered to be the Smith and Wesson method. To me, this is a little easier than sliding both out as a unit as it helps to eliminate scratches on the cylinder, and frame, which could happen when drawing both out as a unit.
2. I was under the impression that the flat screw was in the number 3 position under the grip. My understanding is that the other round head screw can be used to "fix" yoke end shake.
I like the tool you made for the trigger return spring. Since I didn’t have a tool available to modify, I wound up using my 1911 firing pin stop tool to compress the spring on the Model 57 which I just acquired, and tore down. That wound up being easier to use because I was able to shorten up on my grip and set the spring.
Thank you so much for this video… That little pin that goes inside of the rebound spring fell out and no idea where it came from to now.
Awesome job!
Video is helpful. But mine has about 6 more parts in it with really tiny springs..
Very well done……VERY
Excellent instructions 👌
Very informative and well done thank you.
Is this the same basic procedure for the mod. 36 Chief Special?
The most A+ explanation ive ever seen and im not even complaining that you didnt talk about oiling or polishing any parts on the way back in. Its better you didnt so that the focus can be on the job itself. The best part is no stories, no side trips, no nonsense. Thanks so much for making this. Since you kicked yourself for making some mistakes, you might decide to re-make the video one time for all time.
That´s Fate: the sideplate looks like TEXAS 😉
Nice explanation, thank you
This is well done. But allow me some precisions :
• It’s funny when you first call "crane" the "yoke" when you show it but when you use the terms "yoke screw" when it coming to the screw itself :-). Well, "crane" is right too but more… Colt.
•The pin inside the spring of the trigger rebound spring is called the trigger stop rod. It is there to prevent the hammer from going too far backward. There is one only on the magnum rounds chambered revolvers). Little tip : if you want your gun to be DA only, put a little longer rod, you’il see that the hammer won’t reach the SA cocking point any longer.
• What you call the "cylinder block" is actually the "cylinder stop".
• what you call an "arm" on the trigger is in fact the "hand"…
• Other usefull tip : when you reinstall the rebound slide and if you have no handmadetool or the professional tool, use a cruciform screwdriver to push the spring. you’ll see it is perfectly working.
• at 20:28 you put back the wrong screws in place. You switched them. The rounded top one goes in the the middle of the 3 screws, the flat top one goes to the left.
Buen video muy bien explicado,felicitaciones,saludos desde Michoacán mexico